Share:
I have been getting into the gRPC world for quite a while. It’s been on my radar for a long time ever since I got myself into Protobuf, but I never got the chance to use it until last year (If you are unfamiliar with protocol buffer, I wrote an introductory blog a few years ago about it).
The experience so far is great, and I love it, even though it’s not as easy as REST web service to start with. But the more I use it, the more I like it. It brings many benefits to the table, which addresses the problems that REST service has. Of course, it has its disadvantages also.
Before we start digging into it, first we have to know what gRPC is and why we should use it.
The What
So, what is gRPC? As we can easily see from its name, it is a Remote Procedure Call framework that is developed by Google to develop web service. It is open-source, modern, and high performance. Google uses it pretty much all over its internal services and cross data centers communication. The famous Pub/Sub GCP service is built on top of it, and also many others.
So Why
Then, why should we use it? gRPC is coupled with HTTP/2. Understanding what http/2 is will largely help you learn gRPC. We will briefly mention http/2 since it’s not the focus of this blog.
HTTP/2
Http/2, as seen from the version number, is a major upgrade from its predecessor Http/1 (or more precisely, Http/1.1 and Http/1.2).
The semantics of http/2 is the same as http/1, such as methods (GET, PUT, POST, etc.), status codes, header fields, etc. The major differences between these two are that http/2 has the following features:
- Full requests/response multiplexing
- Efficient header fields compression
- Server push and request prioritization
If you still remember the classic 5 layers of the network from your college computer network course, you can tell these are changes in the transportation layer and changes between the application layer and transportation layer.
These changes that enable http/2 can more efficiently use resources and reduce latency. For example, with http/1, if the client wants to perform parallel requests, then each request has to establish a separate TCP connection to the server, and response is delivered through that connection dedicated to it. But with http/2, there is only one connection being established between the client & server at all times. All requests & responses are transferred over this single connection through multiplexing. This is achieved by the introduction of a binary framing layer of http/2, which we won’t go into details as it is out of scope for this blog.
HTTP/2 and gRPC
As mentioned above, gRPC is built on top of http/2 much like REST is built on top of http/1. With the new features of http/2 we briefly talked about before, gRPC can do things that traditional REST services couldn’t do and at the same time, do the same things that REST services can do, but more efficiently.
For example, by using gRPC, you can do client/server streaming (unidirectional/bi-directional), which cannot be done using REST services. And the traditional request/response model in REST can be done by gRPC much more efficiently.
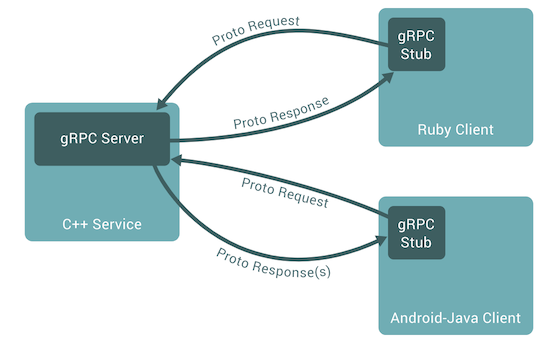
You can use gRPC in multiple platforms and languages, at this time of writing, the languages gRPC supports are C++, Java, C#, PHP, JS, Kotlin, Golang, Python, and pretty much all major development languages. Once you define your service in protobuf file and use it with gRPC plugins, the server and client boilerplate code will be generated for you. What you need to do is just implement your client and server logic by inheriting them correspondingly. One thing to know is that client and server don’t need to be implemented in the same language. You can have a server in Golang, and a client in js or whatever the choices you want to make, client and server exchange information through protobuf message. As depicted in the following picture (picture is borrowed from grpc website):
Practice
Alright, it’s time to dive into practice. Enough theory talk since long theory talk is boring. :)
Preparation
In this blog, we will use kotlin to implement our service and client. Language interpolation will be discussed over the next series of blogs, so bear with me. The first thing to do is to generate a project using gradle, so make sure gradle is installed on your machine.
In terminal, cd to a folder where you want to create your project. Once you are there, run gradle init to start project creation.
Choose application as the type of project. Then for the implementation language choose kotlin, and finally, DSL language chooses groovy. Leave the rest as default.
It depends on the version of gradle you are using. The build.gradle being generated may look different from mine. I am using gradle version 6.4.1.
The build.gradle generated looks like below:
Now, open the project in Intellij Idea. We have to add some protobuf & grpc plugins into this gradle file and configure them.
At the top of build.gradle file, add the following section:
This section mainly defines some variables we will be using later. Then in the plugins section underneath it, add the following plugins:
This will add protobuf plugin to the project, which is required to generate gRPC code for client/server. Then add mavenCentral() to repositories {} section.
Now we have to configure the protobuf plugin, and throw the following after repositories section.
In the code snippet above, we configured the protobuf compiler (protoc) artifact, grpc java plugin (grpc), and grpc kotlin plugin (grpckt) artifacts for protobuf plugin. Then finally generateProtoTasks is configured to generate corresponding code, which we will see later.
Next, in the dependencies block, add the following gRPC dependances:
These will bring in protobuf & grpc related libraries into the project. Finally, we have to configure idea plugin to include the generated protobuf & grpc code into the project module, add the following block:
The preparation/setup is finished, in this blog, we will implement a simple Blog service (blogs data will be hard coded). Let’s get started with writing service in proto file first.
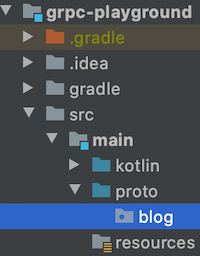
Under src/main, create a new folder calling it proto. Once it’s being created, it should be marked as a module already, if not, try manually marking it as a module. Then within the proto module, create a package called blog. The result should look like below:
Now create a proto file called blog.proto under the newly created package, and add the following lines to the file:
These lines should be self explanatory, which mainly tells how protoc compiler will generate code files, what package name is and generating in multiple files. Move on to service definition, and add the following lines to the file:
These lines first define our BlogService, and then define the message that will be exchanged between client/server, GetBlogRequest, GetBlogResponse, Blog. Notice the syntax to define the RPC service:
rpc GetBlog(GetBlogRequest) returns(GetBlogResponse) {};
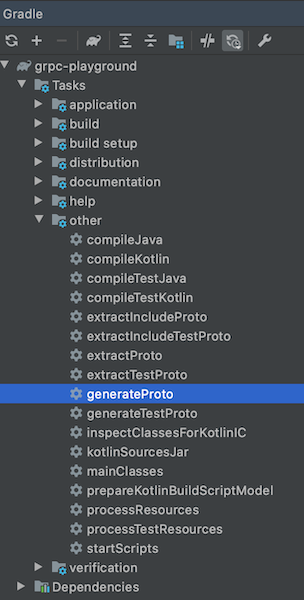
GetBlog is the method call that takes a GetBlogRequest and returns a GetBlogResponse that has a Blog inside it. This is a typical request/response model that can be seen in REST. We are now ready to compile and generate code from this file using gradle task, open the gradle panel inside Intellij, and expand Tasks -> other, there will be a task named generateProto, looks like below:
Double click it. The corresponding code should be generated in build folder looks like the following:
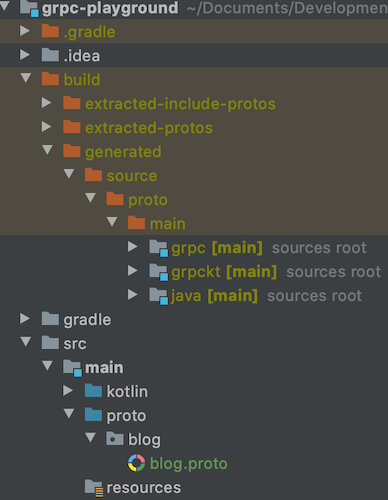
The corresponding codes will be generated in each of those folders. The java folder has all the message classes definition, and grpc & grpckt contain all the grpc related code. Before we start implementing the blog service, let’s create a package named blog under src/main/kotlin/<your main package>, and under blog package create another two service & client packages. Inside service package, create a kotlin class called BlogServiceImpl and let it inherits BlogServiceCoroutineImplBase, the result should look like this:
Let’s override the getBlog method from BlogServiceCoroutineImplBase. We will generate a fake list of blog data, and inside getBlog, we will just return the blog with the id matching id in the request. The resulting code looks like below:
The overall logic is pretty simple, nothing fancy. Notice the getBlog is marked with suspend, which is kotlin coroutine concept. We won’t go into details about kotlin coroutine here. I suggest you go to the kotlin documentation page to check the corresponding reference to get to know more about it.
Congratulations, you just finished your first gRPC service method. Next, we will have to create a gRPC server to add this service to it, so it can serve clients. Go to App.kt file, delete all the class App related code. Only leave an empty main method, and keep the package name in the file also.
Above the main method, we will define a BlogServer class which will encapsulate all the server initialization & shutdown logic. Final code is shown below:
Nothing crazy here. Notice how we build the server and add service to it:
Start the main function in IDE. You should see the server started output from the console. Now the server is running. Let’s move on to the client part. We will write a simple BlogClient class under client package, same as BlogServer, BlogClient will encapsulate the client building, termination, and rpc call, finished code looks like below:
Pay attention to how we build the client and perform rpc call:
The main function will pass in a channel builder through:
Here, we use usePlaintext method, which means there is no SSL security being set since gRPC by default enforces https, but in this demo we don’t need it, so usePlaintext will create a non-secure client. The runBlocking method is also a kotlin coroutine concept, it’s used to bridge blocking & non-blocking code.
You may notice the client method name and parameter are the same with the server method, which makes it look like calling a local method, and that’s the beauty of gRPC. The main function creates a thread pool for the client to use. Notice the client implements the Closeable interface so that it can call the use extension method, which will automatically call the overridden close method when the program ends. When you start the main method for the client, it takes a few seconds to print out the first response, because the initial connection establishment takes a few seconds, but after that, you can see the following response returns immediately.
One thing people can immediately point out is that testing a gRPC service is not as easy as testing a REST service since you can just form a JSON string and send it to a REST service and get a response pretty quickly. This is true and a disadvantage of gRPC, but later on we will talk about how to use the command-line tool, plus gRPC reflection to make testing of gRPC service better.
It takes a long time and a lot of effort to get to this point, now you have your first gRPC service up and running and serving a client. I hope you have a basic understanding of gRPC now. What we have done is just the tip of the iceberg for gRPC. There are still lots of things to cover like client/server streaming, error handling, security, language interpolation, etc. We will cover those topics in the following blogs. I hope you enjoyed this one.
The final code for this blog can be found here.


