Share:
Ever since Docker began to gain popularity a few years ago, it has been struggle to create containers inside containers themselves. The most widely used method of employing docker-in-docker has a troublesome quirk: you have to directly mount the docker unix socket to the building container which runs the risk of sending arbitrary commands to the host docker daemon. Google's solution to this problem is Kaniko.The kaniko-executor image is a standalone container that offers advanced features such as caching and automatically pushing the image to a registry on successful build. Best yet, it can be configured to do so without touching the host machine.
The second piece of this tutorial is to take the image builder and put it in a continuous-integration pipeline. A number of tools have paved the way for this and some represent a significant investment. Drone is a startup friendly (read: cheap) alternative for building apps the scalable way. So let's put the two together shall we?
Before we get started:
You'll need to have the following accounts, and a number of Command Line tools installed:
Additionally, throughout the tutorial I will be including <variables> that you need to substitute with either made up strings or specific strings. Just watch out for them, okay?
Google Cloud Platform
For this tutorial I'm going to suggest you use GCP due to the fact that there is a promotion that $300 of credit is up for grabs to try it out, the CLI is stellar and it works seamlessly with kubectl.
To get started:
gcloud auth login
Follow the provided link to get yourself authenticated with GCP and after you do that it's time to name your project. Maybe drone-kaniko-builder or something that strikes your fancy.
gcloud projects create <project-id>
gcloud set project <project-id>
If you don't get the exact string you typed in, you'll get something back that's close. I recommend exporting variables that you are going to use a lot, this could be a good trial run but we won't need it for this tutorial:
export GCP_PROJECT_ID=$(gcloud config list --format 'value(core.project)' 2>/dev/null)
Before you go creating any Kubernetes clusters, it's likely that you'll need to have the API enabled. Go ahead and do that now --it may prompt you to enter billing information. (just remember the $300 credit is still active if you click that button at the top)
Next, you'll need to select a zone and create your cluster. Before we do that, it's nice to know about what context you're currently in. If you've dabbled with Kubernetes there's a decent chance your context is Minikube:
kubectl config current-context
kubectl config get-contexts
Choosing a nearby zone from the link above, we go ahead and set our region / zone and create the cluster with gcloud.
gcloud config set compute/zone us-east4-a
gcloud container clusters create <cluster-name>
# ---
# wait a few minutes as it creates your k8s cluster
# ---
export CLUSTER_NAME=<cluster-name>
gcloud container clusters get-credentials $CLUSTER_NAME
The last command there sets your kubectl context to this new cluster and retrieves your credentials for future use.
Now for the fun part. Have you heard of Helm? It's magical, let me tell you. The self-named Kubernetes package manager is a tool that allows you to find, use and create repeatable deployable clusters and pods. In this case, we're going to use Helm to install our Drone stack.
To set up helm on our cluster securely let's initialize a RoleBinding to give to our service-account. Copy the following into a rbac.yml :
apiVersion: v1
kind: ServiceAccount
metadata:
  name: tiller
  namespace: kube-system
---
apiVersion: rbac.authorization.k8s.io/v1
kind: ClusterRoleBinding
metadata:
  name: tiller
roleRef:
  apiGroup: rbac.authorization.k8s.io
  kind: ClusterRole
  name: cluster-admin
subjects:
  - kind: ServiceAccount
    name: tiller
    namespace: kube-system
Then you can add the role binding and initialize helm with the service-account:
kubectl create -f rbac.yaml
helm init --service-account tiller
Helm will install a service known as Tiller (ran by a similarly named service account we just created) that will essentially have the ability to spin up and down clusters in this namespace (kube-system).
GitHub for Repositories and Auth
Time to get some OAuth going. Also, a place to put our code. Continuous Integration wouldn't feel like it was worth anything unless it did some stuff automatically on code push.
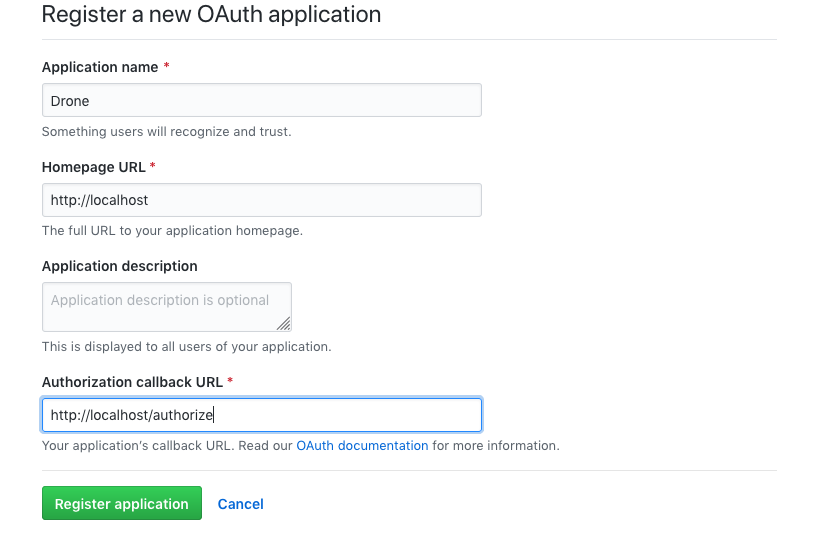
Go here, and click Register a New Application Fill out the form like below, submit it and keep this tab open. We'll come back to it once our stack is up and running. Copy down the Client ID and the Client Secret as you will be needing them for the next part.
kubectl create secret generic drone-server-secrets \
  --namespace=default \
  --from-literal=DRONE_GITHUB_SECRET="<github-oauth2-client-secret>"
The above will create a secret in the Kubernetes cluster that we can access in our Helm Chart.
A Chart.yaml is the file that describes the whole deployable stack. The templates directory has all the disparate Kubernetes files with template tags for conditional variables and more. The final piece is the values.yaml. You can see what's out there by looking at the stable directory on GitHub.
The values.yaml is particularly important here. I made an altered copy of the drone values file here that you should download and use for the initial deployment. Make another copy called my-values.yaml that you can override with your own values.
Edit the file where the following appears:
## Drone server configuration.
## Values in here get injected as environment variables.
## ref: http://readme.drone.io/admin/installation-reference
##
env:
  #DRONE_HOST: "http://<load-balancer-ip-here>"
  DRONE_DEBUG: "false"
  DRONE_DATABASE_DRIVER: "sqlite3"
  DRONE_DATABASE_DATASOURCE: "/var/lib/drone/drone.sqlite"
  DRONE_PROVIDER: github
  DRONE_OPEN: "true"
  DRONE_GITHUB: "true"
  #DRONE_ORGS: "<my-github-org,my-other-github-org>"
  DRONE_GITHUB_CLIENT: "<github-oauth-client-id>"
Enter in the GitHub OAuth Client ID and save the file. Optionally, uncomment and enter in any GitHub Organizations that apply. You might notice that DRONE_HOST is commented out. We'll see to that once we have an external IP.
DISCLAIMER: You should really endeavor to put this cluster behind a firewall and not expose it to the open internet unless you're going to secure it with a SSL cert. There are ways to do this but it is outside the scope of this tutorial.
To deploy Drone, simply:
helm install --name $CLUSTER_NAME-release --values my-values.yaml stable/drone
An installed 'package' from helm is called a release. The naming convention suggests you tag -release on the end of the name. One of the alterations I made to the default values.yaml was to make the service a LoadBalancer which will automatically acquire an External IP. This is very helpful for using OAuth via GitHub.
It takes a minute:
kubectl get svc -w $CLUSTER_NAME-release-drone
When you have your IP, you can return to GitHub and Edit the Drone application settings. Replace 'localhost' with the IP address that is returned in both the Homepage URL as well as the Authorize URL. Don't forget to include the /authorize at the end of the Authorize URL.
Remember that DRONE_HOST environment variable I mentioned? We're going to fix that up now.
helm upgrade $CLUSTER_NAME-release \
  -f my-values.yaml \
  --set 'server.env.DRONE_HOST=http://<ip-of-load-balancer>' \
  stable/drone
As you can see, you can upgrade a deployment with Helm pretty easily. You can start with your values.yaml and override it with --set. Before running the above, enter the IP but don't enter in a trailing slash, Drone will complain at you.
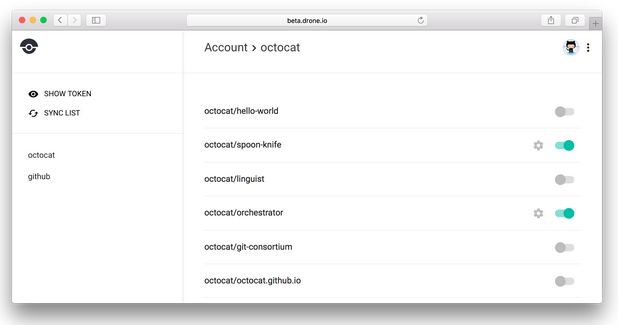
Go visit the IP address in your browser. Once you see the prompt to login and GitHub asks for your permission, you should be presented with the Repositories page.
From here, navigate to: /account/token You shoud see something like this for you to copy down and run in your command prompt:
export DRONE_SERVER=http://<ip-of-load-balancer>
export DRONE_TOKEN=<drone-generated-token>
drone info
Now your command prompt knows where to point the Drone CLI. The main reason we need the Drone CLI is to create secrets to use in our pipeline. The Enterprise / Cloud versions have external secret managers and methods to use them but in our free version we're just going to have to manage them manually. Let's put in our Docker username and password for our secrets. Note: these are constrained to your repo and if you allow the secret to be available on Pull Requests, it is available in that pipeline (security alarm sounds). So unless you trust allll PRs, don't allow that.
drone secret add \
  --event push \
  --event tag \
  --event deployment \
  --repository <org/repo> \
  --name DOCKER_USERNAME \
  --value <my-docker-username>

drone secret add \
  --event push \
  --event tag \
  --event deployment \
  --repository <org/repo> \
  --name DOCKER_PASSWORD \
  --value <my-docker-password>
So at this point you might be wondering... where's Kaniko in all this? Let me introduce you to the star of the show: https://github.com/banzaicloud/drone-kaniko
This nifty project, takes the Kaniko image and wraps it with some configuration so that you can push to a registry other than Google Container Registry or Amazon Container Registry. Additionally, it's set so that it functions as a Drone plugin image which has certain conventions and conveniences.
DISCLAIMER: The project is setup to work well in Drone 1.0.0 but at the time of this writing Drone is still in the release candidate phase and has therefore not become stable in Helm.
Nonetheless, we can use it! Clone this project down and make your own copy of the builder:
docker build -t <my-registry-namespace>/kaniko-builder:latest .
docker push <my-registry-namespace>/kaniko-builder:latest
Now that we have all the pieces in place we can start building images!
Create a .drone.yml in your repo that has the following:
pipeline:
  build:
    image: <my-registry-namespace>/kaniko-builder:latest
    pull: true
    environment:
      PLUGIN_REPO: <my-registry-namespace>/<repo>
      PLUGIN_CACHE: "true"
    secrets:
      - source: docker_username
        target: plugin_username
      - source: docker_password
        target: plugin_password
Create some Dockerfile goodness to test it out bygit push-ing it up to trigger the build. Note: if you haven't already, Enable the repo in question on the Repositories page in Drone. Kaniko supports multi-stage builds and caches them as stages (!!!) which I highly recommend.
Finishing up
So if you like to babysit pipelines as much as I do, you've watched your Dockerfile get built in the Drone build log. The last few lines should be a successful push up to the registry.
From there you should be able to go to your command prompt and pull it down.
docker pull <my-registry-namespace>/<repo>:latest
Thanks for taking a look, I hope you enjoyed the tutorial.
Learn how Callibrity embraces DevOps


